Thanksgiving stove prep means deep-cleaning the cooktop, pulling and soaking burner caps and grates, calibrating the oven with a cheap thermometer, and finishing the work 5 to 10 days before Nov 26 so cleaner residue can dry. Treat fire prevention as part of the job: NFPA reports Thanksgiving is the leading day for US home cooking fires.
This guide walks through thanksgiving stove prep in the order that matters. When to do each step. How to clean each cooktop type without wrecking the surface. How to confirm the oven actually holds the temperature you set. And how to prevent the one accident that turns the holiday into a 911 call. The National Fire Protection Association tracks Thanksgiving as the leading day for US home cooking fires, and the US Fire Administration says cooking causes roughly three of four Thanksgiving-Day residential fires.
For Thanksgiving 2026 (Thursday, Nov 26), the countdown starts around Nov 19. That’s the T-7 window. It’s early enough that residue dries and any appliance repair still has a service window.
Thanksgiving concentrates four to six hours of high-heat, multi-burner, frequently distracted cooking on appliances that may not have been deep-cleaned in months. Three independent data sources highlight the increased cooking-fire risk associated with the holiday.
NFPA’s Thanksgiving cooking-fire data shows that Thanksgiving experiences a substantial increase in home cooking fires compared with a typical day. The U.S. Fire Administration reports an average of 2,300 residential fires on Thanksgiving Day during 2017–2019, with cooking responsible for 74% of them, compared with 51% on an average day. The Illinois Office of the State Fire Marshal, citing NFPA data, recorded 1,610 Thanksgiving Day home cooking fires in 2022 a 399% increase over a typical day with cooktops involved in roughly 60% of incidents and ovens another 13%.
A clean burner, an oven that maintains the temperature you set, and a stovetop free of accumulated grease are important parts of reducing cooking-related hazards during high-volume holiday meal preparation. Equipment readiness complements good cooking habits and helps support a safer kitchen environment.
Most articles ranking for “thanksgiving stove prep” today are broader meal-prep timelines (Serious Eats, Consumer Reports) or whole-kitchen walkthroughs (Real Simple). They mention the stove briefly. The Google “People Also Ask” panel tells a different story: people are typing “clean stove before thanksgiving” and “can I use Dawn dish soap to clean my stovetop” direct equipment-prep questions. That demand-side gap is what this guide fills.
The right answer for your thanksgiving stove prep in 2026 is T-7, which lands on Nov 19.
Disassemble and soak burner caps and grates, degrease the cooktop surface, run the oven’s self-cleaning cycle if you’re going to run it at all (more on that below), and swap the range-hood filter. Cleaner residue needs days, not hours, to dry fully.
Put an oven thermometer on the center rack, set the oven to 350°F, and read after a 20-minute preheat. Check each burner ignition. Test the gas-line shutoff valve. Restock baking soda and salt for fire response. Confirm the smoke alarm has a working battery.
Wipe the cooktop. Clear counter clutter 18 inches from burners. Stage heavy oven mitts, pan lids, and your thermometer within arm’s reach.
Assign each burner to a dish. Stay in the kitchen while burners are on. NFPA’s most-repeated finding: unattended equipment is the leading cause of home cooking fires.
Some homeowners report smoke or chemical odor after cleaning-product residue is left inside an oven and reheated. Thorough rinsing and allowing surfaces to dry fully before cooking helps reduce this risk, which is one reason the deep clean is best scheduled several days before Thanksgiving rather than the night before.
Gas cooktops have the most components to take apart and the most ways to put them back together incorrectly. The protocol below assumes a sealed-burner cooktop the most common modern design.
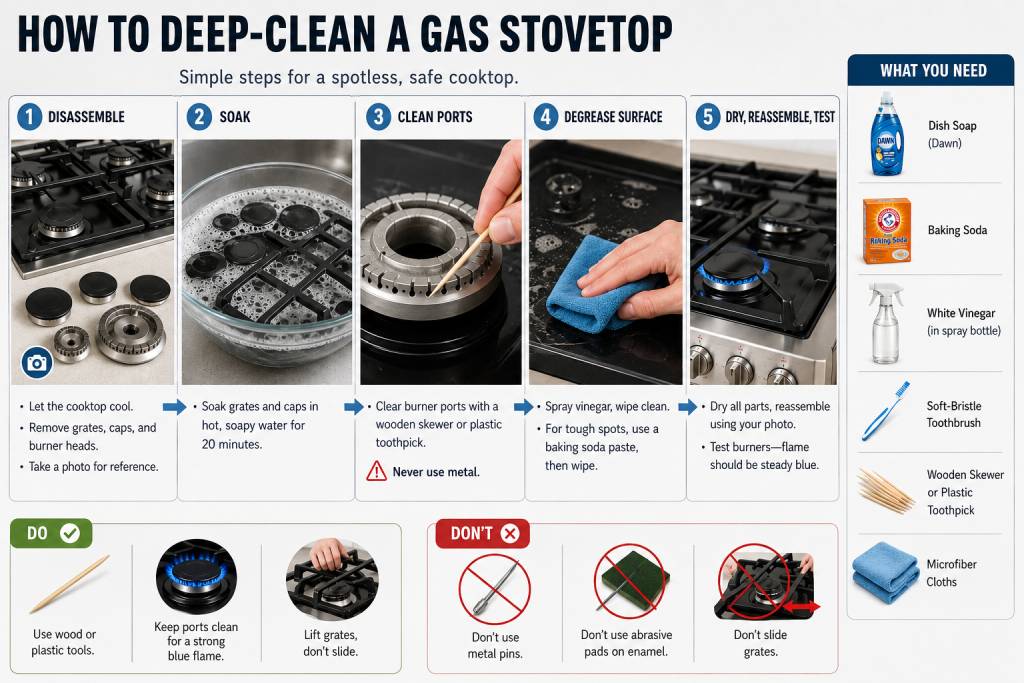
What you need: dish soap (Dawn is a commonly recommended dish soap for removing grease from stovetop surfaces), baking soda, white vinegar in a spray bottle, a soft-bristle toothbrush, two microfiber cloths, and a wooden skewer or plastic toothpick. Never metal.
Let the cooktop cool for 30 minutes. Lift off the grates, then the burner caps, then any burner heads underneath. Photograph each part in place before you move it. Burner-cap orientation matters for flame geometry.
Submerge grates and caps in hot soapy water for 20 minutes. For caked-on residue, apply a paste of three parts baking soda to one part water and let it sit another 15 minutes before scrubbing. Heavy buildup may need a second soak.
The small holes around the rim of the burner head are the gas ports. Clear each port with a wooden skewer or plastic toothpick. Never a metal pin. Manufacturer documentation from GE, Bosch, and Whirlpool is unanimous: a metal tool widens the port, changes the flame pattern, and the burner has to be replaced.
Spray white vinegar across the cooktop and wipe with a wet microfiber cloth. For crusted spots, apply baking-soda paste, wait 10 minutes, and wipe. Avoid abrasive pads on enamel coatings. They leave hairline scratches that trap future grease.
Towel-dry every part. Reassemble using your photos. Test each burner: ignition should be quick, and the flame should be steady blue with no yellow tipping. Yellow tips usually mean a port is still blocked. Repeat Step 3.
Home Alliance’s appliance-service guide covers the basic soak and degrease. The port-clearing step and the reassembly-photo tactic are where most consumer guides stop short.
How do you clean a glass-top or induction cooktop without scratching?
Glass-ceramic and induction surfaces look forgiving but aren’t. Grit under a cloth and abrasive pads leave permanent micro-scratches. On induction, residue between the pan and the glass can throw temperature sensing off.
Never wipe a hot glass top. Cold liquid on a hot surface can crack the glass. That’s manufacturer guidance from every brand.
A single-edge razor scraper, held at a 45-degree angle, lifts burnt sugar and grease without scratching. Most ceramic-top manufacturers Whirlpool, GE, and Frigidaire explicitly approve this method. Check your manual.
A dedicated cooktop cream buffs the surface clean. Cerama Bryte is the category leader; Weiman and Bar Keepers Friend Cooktop are solid alternatives. Baking-soda paste with a drop of water is the no-extra-purchase substitute. Soft microfiber only. No abrasive pads.
A second clean microfiber, dry, buffs the surface streak-free.
Using cleaners that are not approved for your cooktop surface may damage the finish, so spot-testing in an inconspicuous area is recommended before full application.
No. Run it at T-7 at the latest. If you haven’t run it by Nov 19, switch to a manual clean.
The self-clean cycle uses pyrolytic heat 800 to 900°F to incinerate residue. The door lock, control board, and bake-element fuse are the components most likely to fail under that load. The Kitchn made this point most directly in its dedicated piece “The Kitchn: don’t run self-clean before Thanksgiving”. Appliance-repair backlogs the week of Thanksgiving are real, and a failed self-clean on Nov 24 turns the holiday into takeout night.
Apply a paste of half a cup of baking soda mixed with three tablespoons of water across the oven interior. Skip the heating element and the door gasket. Leave it for 12 hours. Spray with white vinegar to lift the paste. Wipe with a damp cloth, then a dry one.
The asymmetry here favors caution. The upside of running self-clean on Nov 24 is a slightly cleaner oven. The downside is no oven on Thanksgiving. Skip it.
An $8 oven thermometer is the single highest-ROI purchase on this list.
In America’s Test Kitchen’s lab testing “America’s Test Kitchen oven-thermometer data“, home ovens missed 350°F by as much as 50°F. That’s a full setting interval. A turkey roasted at an actual 300°F when you set the dial to 350°F finishes 45 to 60 minutes later than the recipe says.
Put the thermometer on the center rack. Set the oven to 350°F. Preheat 20 minutes. Read. If the reading is within 10°F, you’re fine. Off by 25°F or more? Most modern ovens can be recalibrated through the control panel — the procedure is in the user manual under “Oven Calibration”. Older ovens without that feature: adjust the recipe set point.
This matters specifically for the turkey because USDA FSIS “USDA FSIS Safe Thanksgiving guidance” requires 165°F internal at the thigh, the wing, and the thickest part of the breast. The time-and-temperature math only works if the oven actually holds the temperature you set.
Prevention is the deep clean and the unattended-pan rule. Response is four things: lid, baking soda, salt, evacuation. Never water. Never flour. Never move the pan.
Don’t overfill pans. Keep flames clear of grease buildup. Keep a tight-fitting pan lid, a box of baking soda, and a container of table salt within arm’s reach of the cooktop on cook day.
If flames clear the pan rim, reach the range hood, or you can’t smother the fire within seconds, leave the kitchen, close the door behind you, and call 911 from outside. Both NFPA and the US Fire Administration are explicit on this evacuation threshold.
The ANSI/UL Class K rating is designed for cooking-oil fires. Most household extinguishers are ABC. They’ll work on a small grease fire but are noticeably less effective than a Class K unit. The honest limitation: most homes have an ABC unit, and that’s better than nothing. A Class K unit ($40–$60) is worth the upgrade if you fry frequently.
What stove tools and protectors are worth buying before Thanksgiving?
A short shopping list, ranked by ROI.
Skip novelty single-use cleaners marketed only for the holiday season, untested off-brand burner liners without manufacturer compatibility statements, and anything claiming to be “fireproof” without ANSI/UL certification. That word is regulated for a reason.
Can I use Dawn dish soap to clean my stovetop?
Yes on the cooktop surface, with caution inside the oven. Dawn cuts grease on cooled glass, enamel, and stainless steel. For oven interiors, any cleaning-product residue left behind can produce smoke or odor when reheated, so thorough rinsing and drying are important before cooking. Rinse thoroughly and dry at least 24 hours which is why the deep clean belongs at T-7.
Do baking soda and vinegar really clean an oven?
Yes for light-to-moderate buildup, with limits. A paste of baking soda and water applied overnight, then sprayed with vinegar and wiped, removes most grease and food residue without harsh chemicals. For heavy carbonized buildup, the home-recipe approach has clear limits, and a commercial degreaser or a professional clean will do the job faster.
How do I get the black stuff off the bottom of my oven?
The carbonized residue at the oven floor responds best to a 12-hour baking-soda paste soak, followed by a razor-scraper pass (where the manual approves it) and a vinegar wipe. A pumice stone (oven-safe variety) works on stubborn spots. If the residue covers more than 30% of the floor, a professional clean is the realistic option.
How much does it cost to have an oven professionally cleaned?
In the US as of May 2026, a single-oven professional clean typically runs $100 to $200, with double ovens, gas ovens with grates, and heavily soiled units at the upper end. Pricing varies by region. Book at least two weeks before Thanksgiving November appointment slots fill early.
Thanksgiving stove prep isn’t glamorous, and it doesn’t show up in the photos. But on Nov 26, 2026, an oven that holds 350°F, burners that ignite cleanly, a cooktop without two months of grease, and a Class K extinguisher within reach are the difference between a holiday that goes to plan and one that doesn’t. Prep the appliance the way you’d prep the menu. Start your thanksgiving stove prep at T-7 and work the countdown.
Your stove model number sits on a small rating plate in one of three spots:…
Yes, cast iron is safe and well-suited to a gas stove. Match your pan's underside…
The best pans for a gas stove are fully clad stainless steel, seasoned cast iron,…
Repair a gas stove when it's under 8 years old, the fix costs less than…
For most gas stoves, the cleaning supplies you actually need are five. A pH-neutral cooktop…
To remove burner caps safely, turn the burner off, let the stove cool fully, and…