To clean a gas stove top, let it cool completely, then lift off the grates and burner caps to soak in hot soapy water. Spray the surface with a degreaser or 1:1 vinegar-water mix, scrub with a non-abrasive sponge, clear burner ports with a pin (never a toothpick), and dry every part for 30 minutes before reassembly.
A gas stove looks like one appliance, but it’s really six parts that each clean differently. Treat them all the same and you’ll rust your grates, soak your igniter, or chase a yellow flame for a week. Below is the method that actually works in 2026. It’s pulled from manufacturer support documentation, appliance care guidelines, and aggregated user-reported cleaning patterns from public discussions.
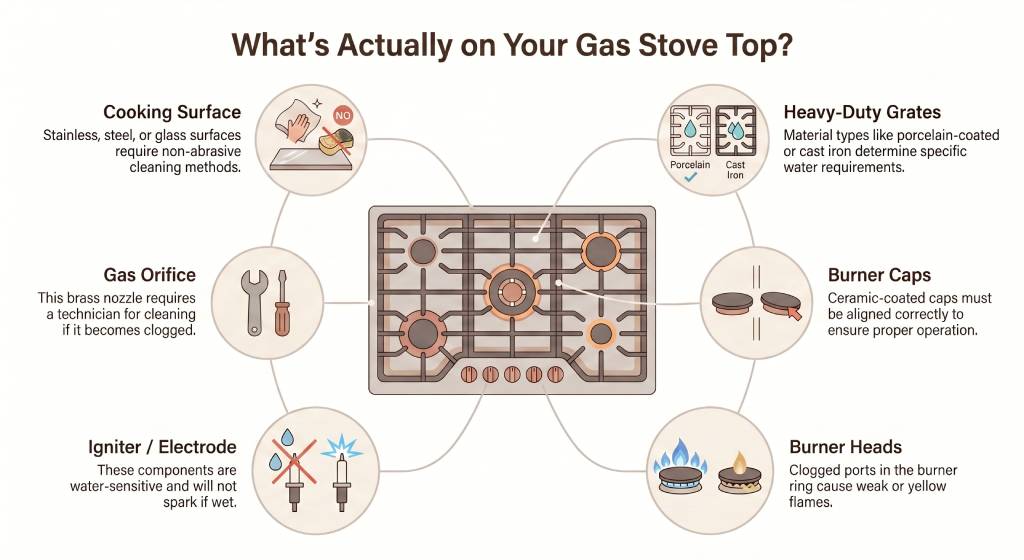
Before you grab a sponge, learn the parts. Each one has its own cleaning rule, and getting them mixed up is how people end up with a stove that won’t ignite.
The KitchenAid Pinch of Help guide and This Old House both lead with this glossary for a reason — once you know which piece is which, the rest of the article basically writes itself.
Most of this is already in your kitchen. The two items people forget are the right port-clearing tool and a microfiber that hasn’t been laundered with fabric softener (softener leaves a film).
Supplies
Tools
Never use a wooden toothpick to clear burner ports. Wood can snap off inside the tiny opening and cause a permanent gas-flow blockage. Manufacturers recommend using a pin, sewing needle, paperclip, or thin wire instead.
That single callout is the most important sentence in this article. Skip it and you can ruin a burner head you can’t replace at the hardware store.
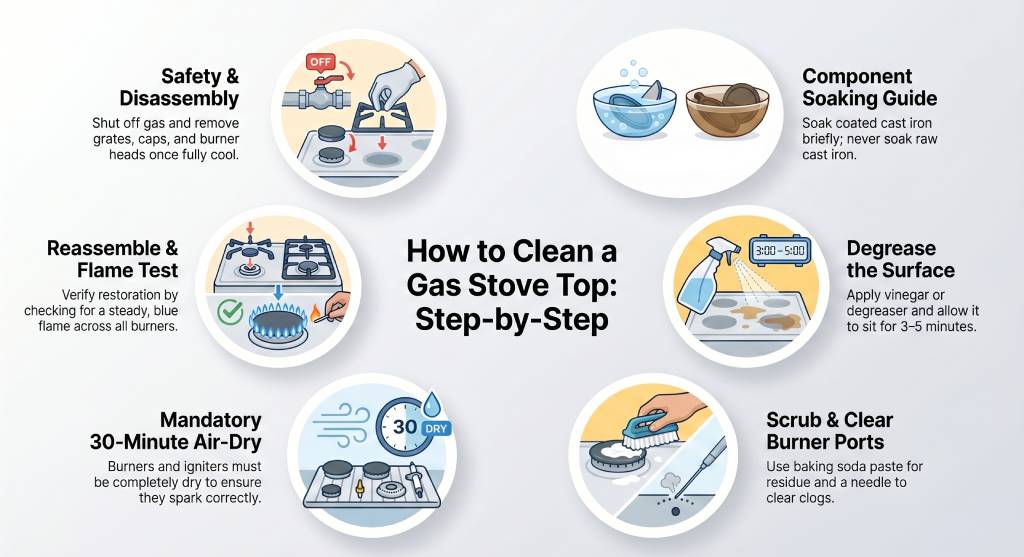
This is the spine. Eight steps, in order. Cutting corners on steps 7 and 8 is the most common reason people post “my burner won’t light after cleaning” threads on user-reported cases.
1. Cool down and shut off gas. Wait until the stovetop is cold to the touch. If your range has an accessible gas-shutoff valve behind it, close it. Never spray any cleaner on a hot surface.
2. Lift off the grates, burner caps, and burner heads — in that order. Caps usually have a small alignment notch or pin. The KitchenAid manual recommends marking which cap goes with which burner if you have different sizes. Reinstalling a small-burner cap on a large burner is a known cause of post-clean ignition trouble.
3. Soak the grates and caps in hot soapy water for the full grate routine, but the short version: coated cast iron tolerates a 10-minute soak max. Uncoated cast iron should not be soaked at all. https://www.bhg.com/how-to-clean-cast-iron-stove-grates-8610987 – “BHG’s January 2024 cast-iron stove grates guide” is the cleanest write-up of the rule.
4. Wipe down the cooking surface. Spray either a commercial degreaser or a 1:1 vinegar-water mix. Let it sit three to five minutes. Wipe off with a microfiber. For burnt-on splatter, move to step 5.
5. Scrub the stuck-on stuff. Make a baking-soda paste — three parts baking soda to one part water, the ratio Maytag recommends in their gas-stove blog. Apply, wait ten minutes, scrub with the soft side of a sponge. For carbonized residue that won’t lift, switch to a single-edge razor scraper held at a 45-degree angle to the surface. Reader’s Digest and HGTV both name the 45° angle. A steeper angle gouges, a flatter angle just slides.
6. Clear the burner ports. Take your pin or needle and work one port at a time. Insert, lift the debris up and out, move to the next port. Do not push debris down into the burner head — you’ll just relocate the clog.
7. Air-dry the burner heads and igniter for 30 minutes minimum. This step is non-negotiable. https://products.geappliances.com/appliance/gea-support-search-content?contentId=17827 – “GE Appliances support” states it directly: “wet igniters and burner heads will prevent a burner from firing up.” Whirlpool reports it can take ten to twelve clicks before a damp burner finally ignites. If you’re impatient, slide the parts into a 170°F oven for thirty minutes. Same effect, faster.
8. Reassemble and test the flame. Each burner cap goes back on its own burner head. Light each burner. The flame should be steady blue. A yellow or orange flame means something is still wet or still clogged. Pull the parts back off, dry them again, and re-clear any ports you missed.
That’s it. The whole sequence takes about an hour the first time and twenty minutes once you’ve done it twice.
Cast iron grates are where most cleaning advice goes wrong. The rule that matters most is whether the grate is coated or uncoated.
Coated cast iron (porcelain enamel — most modern grates from the last fifteen years) can handle a soak. Hot water and dish soap, ten to fifteen minutes maximum. Scrub with a soft brush, rinse, and dry immediately with a microfiber. Don’t air-dry; sitting water leaves spots.
Uncoated cast iron (older ranges, some premium ranges that ship with raw cast iron) gets the same treatment as a cast-iron skillet. Wipe with hot water, scrub with a non-abrasive scrubber, dry on the stovetop on low heat for three to five minutes, and re-oil with a thin coat of vegetable or grapeseed oil. Soaking strips the seasoning and rusts the iron, sometimes within hours.
Chipped enamel counts as uncoated. Once water can reach the underlying iron, the same rust rule applies. If you see chips on more than one grate, it’s worth replacing them — most manufacturers sell direct.
On user-reported cooking discussions and cooking community discussions, several commenters routinely ask whether stove-grate seasoning works the same as skillet seasoning. It does. Same oil, same heat, same logic.
Clogged ports are usually the cause when a burner has a yellow flame, an uneven flame ring, or slow ignition. The fix is mechanical, not chemical.
Use a pin, sewing needle, unfolded paperclip, or small-gauge wire. Insert it into each port, lift the debris up, brush it away, and move to the next port. If the heads have heavy mineral deposits, soak them in 1:1 vinegar-water for fifteen minutes before going back in with the pin.
Do not use ammonia on burner heads. https://products.geappliances.com/appliance/gea-support-search-content?contentId=17278 – “GE Appliances support” is unambiguous: “DO NOT use ammonia to clean the burner heads as this will cause discoloration.” The popular Facebook overnight-ammonia-bag hack works on grates, but it should not be used on burner heads or burner caps.
After clearing the ports, dry the head fully — same 30-minute rule from step 7. The igniter sits right next to each burner head, and even a few drops of trapped water will keep it from sparking. If a burner won’t light after a long dry-out, double-check that the cap is on its correct head and aligned.
Half the cleaning content on the internet says yes. The chemistry says mostly no.
Bill Wuest, PhD, a chemistry professor at Emory University, told https://www.realsimple.com/why-mixing-baking-soda-and-vinegar-to-clean-isnt-always-effective-8757402 – “Real Simple” (and explained at length in The Conversation) that mixing baking soda and vinegar neutralizes both ingredients to salty water and CO2. The fizz is the carbon dioxide escaping. Over 99% of the baking soda remains unreacted in any reasonable cleaning amount. The cleaning power is the residual baking soda’s mild abrasiveness plus your scrubbing — not the bubbles.
Here’s what that means for a gas stove top: don’t combine them in a bowl, slap the foam on, and call it done. That’s mostly visual theatre. Use them on separate passes. Apply a baking-soda paste, scrub, rinse. Then spray vinegar on a second pass to dissolve mineral deposits and any soap film. Two passes, ten minutes total, far better results.
ATK, This Old House, KitchenAid, and Maytag all recommend the combined paste without this caveat. They’re not wrong about the result. The residual baking soda still cleans. But the published “the reaction does the work” framing is misleading.
These four show up as live Google PAA questions for a reason: every household has them, and the labels don’t mention stovetops. Here’s the honest comparison.
| Product | Surface OK? | Notes |
|---|---|---|
| Dawn dish soap | Yes — universal | Mild surfactant, safe on every gas-stove surface. The default. |
| Clorox wipes (bleach) | Conditional | OK on stainless once cool and rinsed off afterward. Avoid prolonged contact on enamel cooktops, and keep them off burner caps — bleach plus residual grease can pit aluminum. |
| Mr. Clean Magic Eraser | Conditional | Works on enameled surface and stainless, but melamine foam is a fine abrasive. On user-reported cases, several commenters report visible scratches after using one on coated cast iron grates. Spot-test a back corner first. |
| Windex (ammonia-based) | No on glass-top, conditional on stainless | On the redflagdeals.com cleaning forum and Hometalk, posters report Windex leaves streaks on enamel cooktops. Weiman warns ammonia-based glass cleaners can leave permanent stains on stove cooktops. |
| Bar Keepers Friend | Yes on stainless | Oxalic acid lifts burnt-on residue without scratching stainless when used as a paste. Not for coated cast iron. |
| Oven cleaner (Easy-Off) | No | Caustic — will damage finishes and most coated grates. Most range manuals explicitly forbid it. |
The short rule: Dawn for daily, BKF for stainless, baking-soda paste for stuck-on, and a degreaser for grease. Everything else is conditional and worth a spot-test for a longer breakdown.
There are four cadences worth tracking. Pick one and stick with it; the after-every-use wipe is the one that prevents 80% of deep-cleaning work.
| Frequency | What to do | Source |
|---|---|---|
| After every use | Wipe surface with a hot soapy cloth once it cools | Marla Mock, President of Molly Maid, via Martha Stewart |
| Weekly | Lift grates, wipe under, rinse caps and heads | user-reported cases consensus across three top threads |
| Monthly | Soak grates + caps, baking-soda paste on stuck spots, port pin-clear | Allrecipes, Maids.com |
| Every 3–6 months | Full disassembly, igniter dry-out, BKF on stainless surfaces | SuperClean blog |
The post-holiday and spring-cleaning peaks in Google Trends data — the week of January 25, 2026 hit value 100, and mid-March 2026 hit a secondary peak — line up with the every-3-to-6-month cadence. Most people clean theirs the day after Thanksgiving and the week after New Year’s, then forget until March. A weekly habit makes the deep clean trivial.
Most gas-stove cleaning is DIY. A few symptoms aren’t.
Wipe the surface after every use, lift the grates and rinse weekly, deep-clean monthly, and do a full disassembly every three to six months. Marla Mock of Molly Maid recommends after-every-use plus weekly as the baseline. Skipping the daily wipe is what creates the burnt-on residue you’ll fight with later.
Yes. Dawn is a mild surfactant that’s safe on every gas-stove surface — coating, stainless, enamel, cast iron. It’s the default cleaner KitchenAid and Whirlpool both recommend. For burnt-on grease it isn’t strong enough on its own; pair it with a baking-soda paste or a dedicated degreaser like Krud Kutter.
Skip ammonia on burner heads (GE Appliances warns it causes discoloration), oven cleaner like Easy-Off, steel wool, abrasive powders on coated finishes, and wooden toothpicks for burner ports. Windex leaves streaks on enamel cooktops per Weiman and forum reports. Bleach is fine on cool stainless if rinsed, conditional everywhere else.
Almost always one of two things: the burner head is still wet, or the ports are still clogged. Pull the cap and head, dry them in a 170°F oven for thirty minutes, and re-clear each port with a pin. If the flame is still yellow after that, the orifice or regulator may need a technician.
Soak coated cast iron in hot soapy water for ten minutes, then scrub with a non-abrasive sponge. For uncoated cast iron, skip the soak — wipe with hot water, scrub, and re-oil. For carbonized spots, apply a baking-soda paste, wait ten minutes, then use a single-edge razor scraper at a 45-degree angle.
Generally no. Most manufacturers — including KitchenAid and Whirlpool — advise against it because dishwasher detergent strips porcelain-enamel finishes over time and rusts uncoated cast iron in a single cycle. A few brands have dishwasher-safe coated grates; check your specific manual. Hand-cleaning is the safer default.
A clean gas stove top isn’t about scrubbing harder. It’s about respecting what each part can and can’t take. Cool it down. Take it apart. Use the right tool for each piece. Dry everything before reassembly. If you wipe after every meal and follow this routine monthly, the every-three-to-six-month deep clean takes twenty minutes instead of two hours. After cleaning, many homeowners use heat-resistant cooktop protectors like StoveShield to reduce future grease buildup and make daily wiping easier.
Wipe the cooktop after every use, and once a week soak gas burner caps and…
Shopping for a new gas range? Whirlpool has been making reliable kitchen appliances for over…
LG has quietly become one of the most trusted names in gas ranges. They've earned…
Key Takeaways GE gas ranges rank among the most reliable in the industry, with a…
Health Disclaimer: This article is for general informational purposes only and does not constitute medical…
This article is for informational purposes only and does not constitute medical or nutritional advice.…