To remove burner caps safely, turn the burner off, let the stove cool fully, and lift the cap straight up off its base without prying. To reseat burner caps, drop the dry cap onto its matching base so the notch or pin aligns, press until flat, and confirm ignition within about four seconds.
Most homeowners land here because a burner clicks and refuses to light after a clean-up, or a cap rocks and won’t stay flat. Both usually trace to the same fix: the cap is on the wrong base, in the wrong orientation, or went back to wet. Each burner takes under five minutes.
A burner cap is the round metal disc that sits on top of a sealed gas burner. It distributes gas from the burner head outward through its ports so the flame ring stays even. Underneath the cap is the burner base (also called the burner head), which carries the gas channel, the igniter electrode, and the alignment pin or notch that tells the cap which way is “up.”
When the cap sits flat and on-center, the flame is blue and circles the entire cap. When it sits crooked, three things go wrong. The flame becomes uneven with yellow tips (incomplete combustion). Gas can vent past the igniter and never ignite. And a wobbling cap can rock off the base when a pot bumps it. Gas flames reach extremely high temperatures at the inner cone, so a cap venting in the wrong direction is a safety problem, not a cosmetic one. The cap also shields the igniter electrode from boilover liquids.
Four moments call for lifting the cap. First, after any boilover: sugar, tomato sauce, and oil bake into the ports and choke gas flow. Second, when one burner clicks but won’t light while others fire normally. Across homeowner forums and appliance technician service logs, most pull-and-reseat fixes come down to a wipe of the cap or igniter. Third, when you’re replacing a cracked or warped cap (most common on porcelain-coated caps thermally shocked by cold water on a hot stove). Fourth, routine maintenance every few months.
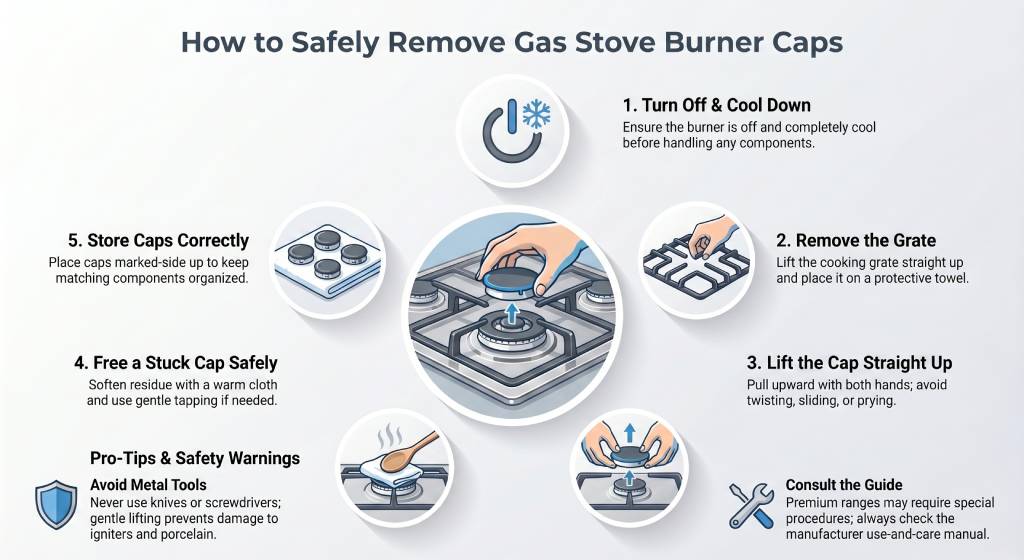
Removal is mechanical and slow on purpose. Rushing it bends pins and chips porcelain.
Step 1: Turn the burner off and confirm full cool-down. Caps can hold heat for fifteen to twenty minutes after the flame is out, and dropping a hot cap into cool water can crack it.
Step 2: Lift the cooking grate clear. Cast-iron grates lift straight off. Set them aside on a folded towel to protect the cooktop surface.
Step 3: Lift the cap straight up. Use both hands and pull vertically. Don’t slide, twist, or pry with a knife. You’ll gouge the burner base or break the ceramic igniter beside it.
Step 4: Handle a stuck cap gently. Caked-on sugar or grease can glue the cap to the base. A warm wet cloth placed around the cap edge for about ten minutes can help soften baked-on residue and loosen the bond. A vinegar-water paste at the seam, left for five minutes, can help loosen the bond before another straight lift. Tapping the cap with the wooden handle of a spoon can break the seal. Never use a metal tool.
Step 5: Set caps marked-side up on a towel. Many caps carry a letter, number, or paint dot on the underside indicating which base they match.
Brand-specific note: Sub-Zero and Wolf Dual Fuel ranges and CT-series cooktops built before serial number 17000000 add a step. After lifting the burner head, flip it over and use a wrench to loosen a cap nut on the underside before the cap separates. Post-serial-17000000 Wolf models lift off normally. Consult your use-and-care guide first.
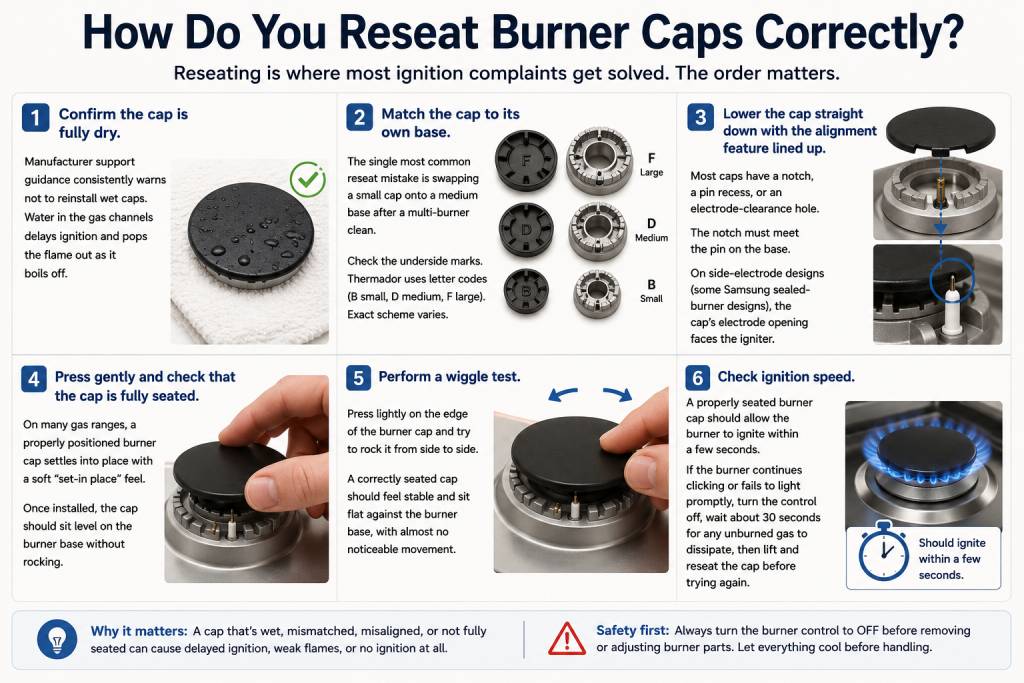
Reseating is where most ignition complaints get solved. The order matters.
Step 1: Confirm the cap is fully dry. Manufacturer support guidance consistently warns not to reinstall wet caps. Water in the gas channels delays ignition and pops the flame out as it boils off.
Step 2: Match the cap to its own base. The single most common reseat mistake is swapping a small cap onto a medium base after a multi-burner clean. Check the underside marks. Thermador uses letter codes (B small, D medium, F large). Per manufacturer manuals, the exact scheme varies; if your cap has no mark, track which base each came from during removal.
Step 3: Lower the cap straight down with the alignment feature lined up. Most caps have a notch, a pin recess, or an electrode-clearance hole. The notch must meet the pin on the base. On side-electrode designs (some Samsung sealed-burner designs), the cap’s electrode opening faces the igniter.
Step 4: Press gently and check that the cap is fully seated. On many gas ranges, a properly positioned burner cap settles into place with a soft seated feel or a distinct set-in place sensation. Once installed, the cap should sit level on the burner base without rocking.
Step 5: Perform a wiggle test. Press lightly on the edge of the burner cap and try to rock it from side to side. A correctly seated cap should feel stable and sit flat against the burner base, with almost no noticeable movement. If the cap rocks easily or feels uneven, lift it off and reseat it before testing the burner.
Step 6: Check ignition speed. A properly seated burner cap should allow the burner to ignite within a few seconds. If the burner continues clicking or fails to light promptly, turn the control off, wait about thirty seconds for any unburned gas to dissipate, then lift and reseat the cap before trying again.
When a cap refuses to sit flush even after a careful reseat, work through these in order.
Wrong cap on the wrong base. Easiest to fix and the most common cause. Lift all caps, check the underside marks, return each to its own burner.
Pins worn or burner base bent. A shortened, mushroomed, or bent alignment pin will rock the cap no matter what. Bent bases are a parts-replacement repair.
Moisture trapped under the cap. A cap can sit flat on a wet base and still cause clicking with no ignition. Lift, dry both surfaces, and air-dry twenty minutes before reinstalling.
Igniter ceramic chipped or protruding. A cracked white ceramic nub sticking up higher than its neighbors holds the cap off the base. The igniter needs replacement, not cleaning.
Cracked underside on the cap. Porcelain caps hairline-crack from thermal shock. Run a fingertip around the underside; any catch or rough line means replace it.
The standard “lift, align notch, press, click” workflow covers most US gas ranges. These brand-specific differences are the ones most worth knowing.
For additional brand-specific repair procedures, consult your model’s use-and-care manual or appliance repair resources such as PartSelect.
Five recurring mistakes cause most callbacks. Forcing a cap that won’t sit flat is almost always the wrong cap on the wrong base; lift and re-sort. Reinstalling a wet cap delays ignition and pops the flame off; air-dry first. Using wooden tools to clear burner ports is discouraged in manufacturer cleaning guidance, as wood fibers can break off inside burner ports; use a straightened paperclip or sewing needle on fully cooled brass ports. Running the self-clean cycle with burner caps left inside the oven cavity is another one: the pyrolytic heat discolors and warps them. Aggressive abrasives on porcelain-enamel caps round out the list, since steel wool scratches the coating, which then traps food faster.
When Should You Call a Professional?
DIY ends at four hard lines. If you smell gas while attempting to light a burner, stop, turn all knobs off, ventilate the kitchen, and call a licensed technician or your gas utility’s emergency line before trying again. If the burner still fails to ignite within four seconds with a correctly seated, dry cap, the igniter, spark module, or gas orifice likely needs service. If a porcelain cap is cracked or an igniter ceramic is chipped, replace the part before further use. And on Sub-Zero / Wolf ranges where burner rings are part of the assembly, those rings should only be removed by authorized service technicians.
How do I take off burner caps without damaging them?
Wait for the stove to fully cool, lift the grate clear, then lift the cap straight up using both hands. Don’t pry, slide, or twist. If a cap is stuck from baked-on residue, soak the seam with a warm wet cloth for ten minutes or apply a vinegar-water paste at the edge for five minutes before lifting again.
How do I realign a burner cap on a gas stove?
Lift the cap, confirm it matches its correct burner base by checking the underside mark, and lower it back into position so the notch aligns with the pin (or the electrode opening faces the igniter). Press gently to ensure the cap sits fully on the burner base, then lightly rock it from side to side. If it remains level with almost no wobble, it’s properly seated.
Why is my gas burner cap so hard to get off?
Dried boilover residue acts like glue between the cap and base; sugar, oil, and tomato sauces are the worst offenders. A warm damp cloth on the seam for ten minutes, or a vinegar-water paste for five, will break the bond without prying.
Are burner caps necessary?
Yes. The cap distributes gas through its ports so the flame ring forms evenly and shields the igniter electrode from boilover liquids. Running a sealed gas burner without its cap produces uneven yellow flames and is warned against in most manufacturer guidance.
Why won’t my burner stay lit when I release the knob?
The flame-failure safety depends on the thermocouple sensing heat from the flame. If the cap is misaligned, the flame may not reach the thermocouple, and the gas safety valve closes the moment you let go of the knob. Reseat the cap, confirm the flame circles the entire base, and hold the knob for five to ten seconds during ignition.
Knowing how to remove burner caps and reseat burner caps correctly comes down to six habits: burner off and fully cool; lift straight up; match each cap to its own base; reseat dry with the alignment feature on-target; press for the audible click and confirm minimal wobble; verify that the burner ignites promptly after reassembly. When those steps fail, the issue is no longer the cap. It’s a worn igniter, damaged base, or parts replacement, and a licensed technician should take over.
A gas stove should not smell like gas when off. A faint odor right behind…
If your gas burner lights but dies the second you let go of the knob,…
A yellow flame on your gas stove signals incomplete combustion and a possible carbon monoxide…
Wipe spills after every cook, do a full gas stove wipe-down weekly, run a monthly…
The ammonia bag cleaning method works on porcelain-enameled cast iron grates and most burner caps…
To season cast iron stove grates, scrub them clean, dry them fully, rub a thin…