To season cast iron stove grates, scrub them clean, dry them fully, rub a thin layer of neutral high-smoke-point oil (grapeseed, canola, or refined avocado) over every surface, and bake them upside down at 400°F for 60 minutes. Let them cool inside the oven. The heat triggers polymerization, bonding the oil into a hard, matte black, rust-resistant finish.
I learned how to season cast iron stove grates the hard way. The first time I tried it was on a Wolf gas range in 2023. I used olive oil, baked at 300°F, and ended up with grates that stayed sticky for a week. Since then I’ve reseasoned the same set eight times, tested grapeseed against flaxseed, and read dozens of published guides. Few mainstream guides explain the chemistry in plain English. Most guides focus on only one part of the process, either cleaning or seasoning, rather than explaining how both work together. This guide includes an oil comparison, a first-time workflow, and a real troubleshooting section.
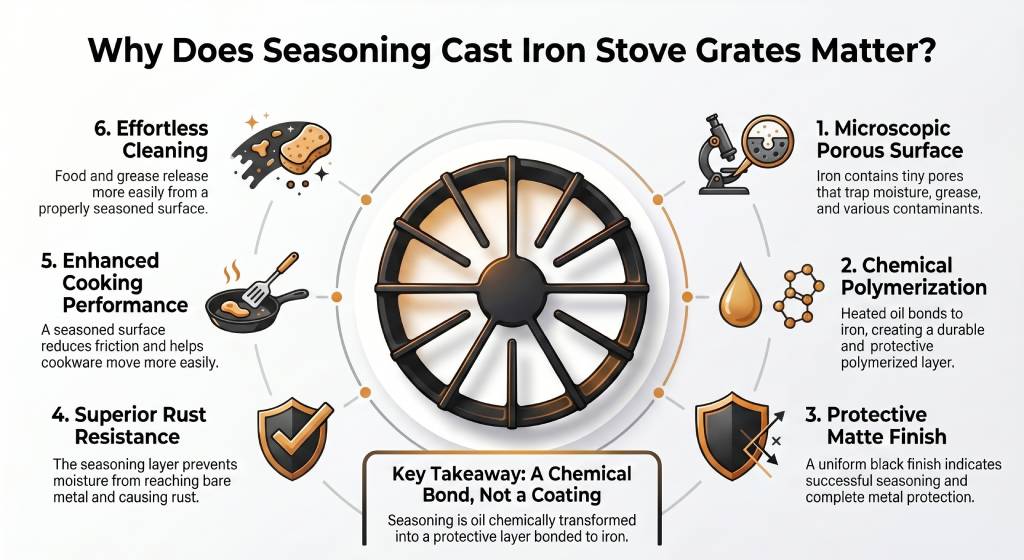
Cast iron is porous. Under a microscope, the surface looks like a sponge, full of microscopic pits and ridges. Left bare, those pits collect moisture from spills, simmering pots, and even humid kitchen air. Within a few weeks you get orange flash rust. Then deeper pitting. Then food that sticks to every burner ring you own.
Seasoning fixes that. When you heat a thin layer of cooking oil on iron past its smoke point, the oil molecules break apart and re-bond with each other in a process called polymerization. The result is a thin, hard, plastic-like film, chemically bonded to the metal. You’re not spraying on a coating. You’re chemically transforming the oil itself. Engineer Fix’s December 2025 restoration guide describes the same mechanism, alongside saponification (the soap-forming reaction that ruins seasoning if you soak grates overnight in dish soap).
A properly seasoned grate gives you four things:
The matte black look isn’t cosmetic. It’s a visual confirmation that polymerization happened. If your finish is glossy and tacky to the touch, the oil didn’t fully cure. We’ll cover that in troubleshooting.
Three things: a way to clean the grates, the right oil, and an oven that fits them. Most standard gas range grates lie flat in a 24-inch or larger oven. Measure first if you’re not sure.
Most guides skip this. Smoke point matters because polymerization needs heat above the smoke point. Bake at 400°F using an oil that smokes at 375°F and you’ll get a billowing kitchen plus a half-cured finish. Below is the side-by-side I wish I’d had in 2023.
| Oil | Refined smoke point | Pros | Cons | Approx. cost (32 oz, 2026 US) |
|---|---|---|---|---|
| Grapeseed | ~420°F | Neutral flavor, thin viscosity, even coverage, widely available | Pricier per ounce than canola | ~$10 |
| Canola | ~400°F | Cheapest, neutral, works at 400-425°F bake | Slightly thicker; can go rancid in 6-9 months if stored warm | ~$5 |
| Avocado (refined) | ~520°F | Highest smoke point on this list, ideal for 450°F bake | Most expensive; check label says “refined” not virgin | ~$15 |
| Flaxseed | ~225°F (raw) | Builds a glassy, hard finish in fewer cycles | Famously flakes off in patches months later; expensive; goes rancid fast | ~$18 |
| Vegetable shortening (Crisco) | ~360°F | Cheap, solid at room temp, easy to apply thin | Below ideal bake temp; can leave sticky residue if you over-apply | ~$6 |
| Olive oil (EVOO) | ~375°F | Always on hand | Smoke point is too low for a proper bake; will smoke at 400°F and leave a tacky finish | |
| PAM spray | n/a | Convenient | Not recommended. Contains soy lecithin and propellants that polymerize into a gummy, splotchy residue |
In my own kitchen, grapeseed gives the most consistent matte finish in a single bake cycle. Flaxseed builds a beautiful glassy black in 4-5 cycles, but it flaked off my front-left grate after about four months. I’ve stopped using it. Canola is the budget answer. Works fine.
This is the standard oven method, sequenced for new grates that need a clean baseline or for older grates after a deep clean. If you only need a quick touch-up, skip to the “spot-seasoning” note at the end.
Step 1: Strip the grates. Run hot water over the grates in a deep sink or laundry tub. Use a few drops of dish soap and a nylon brush to lift visible grease. Soap is fine here. The “never use soap on cast iron” rule applies to seasoned skillets, not to a strip-and-reseason cycle, because you’re about to rebuild the patina from scratch.
Step 2: Tackle rust and blotchy spots. Make a thick paste of Bar Keepers Friend and water. Spread it on rust, orange spots, or white mineral deposits. Wait 60-90 seconds. Scrub with a non-scratch pad. For deep rust, switch to ultra-fine steel wool, then rinse thoroughly to remove any loose metal fibers. Rinse until water runs clear and you no longer feel grit.
Step 3: Dry completely. This is the step almost every guide rushes. Towel-dry, then either put the grates on a low burner for 5-10 minutes or in a 250°F oven for 15-20 minutes. Several appliance-care discussions and restoration guides recommend the same low-oven drying approach. Damp iron plus hot oil equals steam pockets and an uneven finish. Wait until the metal is bone dry and slightly warm.
Step 4: Apply oil, thinner than you think. Pour about a teaspoon of grapeseed (or canola, or refined avocado) onto a folded paper towel. Rub the entire grate, top, bottom, sides, and inside the cross-ribs. Then take a clean paper towel and buff hard, as if you’re trying to remove the oil. You should not see a wet sheen. The grate should look almost dry. Too much oil is the number one cause of sticky, blotchy finishes.
Step 5: Bake. Place the grates upside down on the middle rack. Slide a foil-lined sheet pan on the rack below to catch drips. Bake at 400°F for 60 minutes. If you’re using refined avocado oil, you can bump to 450°F. The temperature must exceed your oil’s smoke point for polymerization to complete. Expect light smoke for the first 10-15 minutes. Crack a window and run the range hood.
Step 6: Cool in the oven. Turn the oven off. Leave the grates inside for 60-90 minutes. The slow cool prevents thermal shock and lets the polymer settle. Once the grates are cool enough to handle, they should feel dry and look matte black or very dark brown. Press a paper towel against them. No tacky spots means you’re done.
Spot-seasoning note: Once your grates are seasoned, you don’t need this whole cycle every time. When you see a dull patch or a small rust freckle, scrub that spot, wipe on a drop of oil, and run the gas burner under that grate on medium-high for 10-15 minutes. That’s spot-seasoning. It’s how you maintain the finish between deep cycles.
New grates are different. They look ready to use straight out of the box, but most factory finishes are a thin, sprayed-on pre-season that wears off in weeks. This is a very common question, and many guides don’t explain it clearly.
For first-time seasoning, run the full step-by-step above, but repeat steps 4, 5, and 6 two or three times back-to-back. So you’d oil-bake-cool, then oil-bake-cool, then oil-bake-cool. Three thin cycles build a stronger, more even base than one thick cycle.
Why three? Each cycle deposits one polymer layer, maybe 1-2 microns thick. Three layers give you enough depth to survive a few months of normal cooking before you need another touch-up. BHG’s March 2024 guide says to repeat until grates look uniformly dark, which usually lands at 2-3 cycles.
A few first-time tips:
Cleaning is where most seasoning jobs go to die. The grate looks great on Sunday, you cook a tomato sauce on Tuesday, and by Friday you’ve scrubbed off half the patina with a green pad and dish soap. Here’s the routine that’s kept my Whirlpool grates black for two years.
After every cook: Wait until the grate is warm, not screaming hot. Brush off loose debris with a stiff nylon brush. If something stuck, splash a few tablespoons of warm water on the still-warm grate and scrape with a plastic pan scraper or a balled-up paper towel. Towel dry. Done. No soap.
Weekly: Lift the grates off the burners. Wipe them with a damp microfiber cloth. Inspect for dull spots or rust freckles. Spot-season any you find.
Monthly (or after a big spill): Soak grates in hot water with a few drops of dish soap for 10-15 minutes. Not overnight. Long soaks trigger saponification, which converts the polymer back into soap-like molecules and strips the finish. The Engineer Fix restoration guide (Dec 2025) discusses this in detail.
Scrub gently with a non-scratch pad, rinse, dry on a low burner, and wipe a drop of oil over the surface.
Forbidden methods (and why):
If your grates are orange, gray, blotchy, or have white mineral deposits, you’re not seasoning them. You’re restoring them first, then seasoning. This is also the answer to “how to make cast iron stove grates black again” and “how to make cast iron stove grates look new again,” both of which appear in the People Also Ask box in May 2026.
For light rust and blotches (most grates):
For heavy rust (orange across the entire surface):
For grates that have turned white (autocomplete: “cast iron stove grates turning white”): White patches are usually mineral deposits from hard water or salt residue from food. They aren’t rust. Scrub with Bar Keepers Friend, rinse, dry, and re-season the affected area. If they keep coming back, dry the grates more thoroughly after washing. Standing water plus dissolved minerals leaves a white ring every time.
Most guides stop after the bake. Real kitchens have problems. Here are the four I see most often, with fixes that work.
Problem: heavy smoke during the bake. Cause: too much oil, or your oil’s smoke point is below your bake temperature. Fix: open the oven after 15 minutes, check for pooling oil, blot it with a paper towel, and finish the cycle. Next time, buff the oil harder before baking and confirm your oil-temp pairing (grapeseed for 400°F, refined avocado for 450°F, Avoid olive oil.
Problem: sticky or tacky finish after cooling. Cause: the polymer didn’t fully cure. That means either the oven temp was too low, the bake was too short, or you used PAM-type spray. Fix: scrub the sticky layer off with Bar Keepers Friend, dry the grates, and re-bake at 425°F for 60 minutes with a properly thin layer of grapeseed. If you’ve been using spray oils, switch to a neutral liquid oil like grapeseed or canola for more reliable seasoning results.
Problem: white or chalky spots after the bake. Cause: usually mineral deposits left behind because the grates weren’t fully rinsed or fully dried before oiling. Fix: scrub spots with Bar Keepers Friend, rinse hard, dry on a low burner for 10 minutes, then spot-season.
Problem: patchy or blotchy finish, dark in some areas, gray in others. Cause: oil applied unevenly, or the grate had spots of moisture before baking. Fix: don’t worry about cosmetics for now. Use the grates for two or three weeks. Normal cooking deposits seasoning on the hot spots and evens out the look. If it still looks bad after a month, do one more full oil-bake cycle.
Bonus problem: silicone splatter mats melting near the burner. Silicone is rated to about 450°F. Gas flames can reach temperatures beyond what silicone mats are designed to handle. Many silicone splatter mats, oven liners, or stove-top protectors aren’t explicitly rated for open-flame contact. If you want gas-range surface protection, consider materials other than silicone designed for it.
What is the best oil to season cast iron stove grates with?
Grapeseed oil is the best all-around choice. Its 420°F smoke point sits just above the standard 400°F bake temperature, it’s neutral, and it goes on thin and even. Canola at 400°F is the budget alternative. Refined avocado at 520°F works if you prefer a hotter bake. Avoid olive oil (smoke point too low), flaxseed (prone to flaking), and any spray oil like PAM (gummy residue).
How often should you season cast iron stove grates?
Plan a full oil-bake every 6-12 months under normal use. Spot-season any dull patches, rust freckles, or scratched areas as you notice them. If you cook acidic foods (tomato sauce, vinegar-based marinades) often, you’ll re-season more frequently because acid degrades the polymer faster.
Can you put cast iron stove grates in the dishwasher?
No. Dishwashers strip seasoning in a single cycle. The combination of high-temperature water, detergent, and prolonged moisture exposure removes the polymerized oil layer and triggers flash rust within hours. Manufacturers and care guides from brands like Lodge and Better Homes & Gardens advise against it.
How long does it take to season cast iron stove grates?
A single oil-bake cycle takes about 90 minutes from oven-on to grates-cool: 60 minutes at 400°F plus 30-90 minutes of in-oven cooling. For new or fully restored grates, plan on 3-4 hours total to run two or three back-to-back cycles. Spot-seasoning a single dull patch on the stovetop takes 10-15 minutes.
Why are my cast iron stove grates sticky after seasoning?
Stickiness means the polymerization didn’t finish. Three usual causes: too much oil applied (the most common), bake temperature below the oil’s smoke point, or use of a spray oil like PAM that contains lecithin and propellants. Strip the sticky layer with Bar Keepers Friend and re-bake at 425°F for 60 minutes with a wiped-thin layer of grapeseed or canola.
Can you use Dawn Powerwash on cast iron grates?
Once in a blue moon, for a deep restoration cycle, yes. As a regular cleaner, no. Powerwash is a high-surfactant foaming degreaser, and the same surfactants that lift baked-on grease also strip polymerized oil. If you use it, plan on re-seasoning the grates afterward. For routine cleaning, hot water and a nylon brush are enough.
To clean stove knobs without wiping off the labels, pull each knob straight off. Wash…
To clean a stainless steel stove top without streaks, wipe along the brushed grain with…
Stove top protector material falls into two core types: Fiberglass-based and silicone-based. Fiberglass-based protectors with…
A stove top protector is worth it if you cook daily, fight stuck-on grease, or…
The 2026 gas stove vs electric stove vs induction decision comes down to three trade-offs:…
To replace a gas stove igniter, shut off the gas supply valve and unplug the…